Removing old photos from sticky or magnetic albums can feel risky - one wrong move and a cherished memory could tear or fade. If you’re wondering how to safely remove photos from sticky albums without causing damage, you’re not alone. Many older albums use adhesives that degrade over time, making photos harder to lift without harm. The good news? With the right techniques and a gentle approach, it’s possible to save your images and preserve them for years to come. Below, we’ll show you exactly how to unstick old photos step by step - and when it’s safer to scan first instead.
The Best Way to Unstick Photos from Sticky Albums
The safest way to remove photos from sticky or magnetic albums is to gently loosen them using dental floss, low heat from a hair dryer, or a photo spatula, without pulling or peeling.
- Dental floss: Slide unflavored, wax-free floss behind the photo to gently separate it from the page.
- Hair dryer: Apply low heat to the back of the album page for 20–30 seconds to soften the adhesive, then lift carefully.
- Photo spatula: Use a thin, flexible archival tool to slide under the photo without bending it.
Avoid using high heat, moisture, or freezing. These methods can warp or damage your photos permanently.
If your album is brittle or photos are stuck too firmly, the safest option is to scan the entire page first before attempting removal. Try a photo digitizing service like Capture to preserve your memories without risking damage.

Older “magnetic” albums used acidic glue that can permanently bond to your photos.
Why Do Photos Get Stuck in Old Albums?
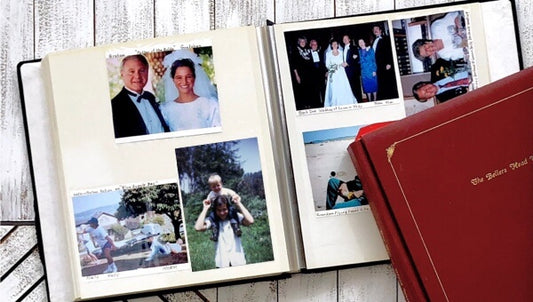
Photos often get stuck because many older albums used non-archival adhesives that break down over time. These were commonly known as "magnetic photo albums" but the name is misleading. There’s nothing magnetic about them.
Instead, these albums had:
- Cardboard pages coated in sticky adhesive
-
A plastic sheet overlay to press the photo onto the glue
They were called "magnetic" because the adhesive seemed to "magically" hold photos in place. But the glue wasn’t designed for long-term preservation. As it aged, it turned acidic, which caused:
- Photos to bond tightly to the page
- Image discoloration and fading
- Moisture and heat to get trapped under the plastic, speeding up damage
Once this happens, trying to peel off a photo can cause it to tear or warp. If you're working with an album like this, it’s best to act carefully.
Step-By-Step Methods to Remove Photos Safely
Removing photos from sticky albums takes patience. You’ll want to try the safest option first, based on the photo’s condition. If you're unsure how to unstick old photos without damage, start with gentle methods and stop if you feel resistance. If anything seems risky, scanning first might be the smartest move.
Method 1: Use Dental Floss to Gently Separate
Dental floss works well for lifting photos without bending them.
Start with the corner of the photo. Use waxed, unflavored floss. It slides more easily and won’t leave sticky bits behind. Wrap both ends around your fingers and slide the floss slowly behind the photo. Use gentle side-to-side motions as you move downward.
This method is best when the photo hasn’t melted fully into the page. If the glue is dry or flaky, floss should work. But if you feel pulling or bending, don’t force it. Scan it first using a photo album scanning service instead.
Method 2: Warm the Adhesive with a Hair Dryer
A bit of warm air can soften glue and make removal easier.
Use the lowest setting on your hair dryer. Hold it a few inches away and aim at the back of the album page, not directly on the photo. Move the dryer in circles for about 30 seconds, then check if the corner lifts.
If it does, use a thin card to lift the photo. If nothing happens, stop. More heat could melt the photo or burn the page. For delicate albums, don’t risk it. This method can help you safely remove photos from sticky pages, but only when done carefully and with the right conditions.
Method 3: Try a Photo Spatula or Archival Tool
Use a photo spatula when floss or heat doesn’t work.
Photo spatulas are tools that look like small rounded blades. They’re made of plastic or metal and designed for delicate tasks. You can find them online or in art supply shops. Hold it flat and slowly push it under the photo at one corner.
Work from different angles and avoid scraping down too hard. If you feel resistance, don’t keep pushing. A spatula helps when glue is soft or slightly tacky, but not when it's fully bonded. You can always stop and use a photo scanning service in Boston to scan the image before it gets worse.
Method 4: Scan the Album Page Instead
If the album is fragile or photos won’t budge, professional digitization is the safest choice.
When photos are firmly bonded to the page, trying to unstick them can cause irreversible damage. In these cases, the best solution is to digitize the entire album page using a professional scanning service. This preserves every detail—without risking tears, fading, or loss.
Scanning is ideal for irreplaceable family albums, baby books, or anything older than 40 years. It’s also helpful if your hands shake or you feel unsure. Don’t take risks. Digitize now and protect the past.

Low heat can soften glue, but too much can damage the photo—use with caution.
What to Avoid When Removing Old Photos
While there are plenty of tips online about how to get pictures out of old albums, not all of them are safe. To protect your images, avoid these common mistakes:
Do not freeze the album
Freezing is sometimes suggested as a way to loosen adhesives, but it can backfire. Most photo albums were not designed for extreme temperatures. Freezing can cause the pages to become brittle and may lead to condensation once thawed—risking water damage, warping, or fungal growth.
Never pull or peel photos directly
Forcing a photo out of a sticky album is one of the quickest ways to tear it. Even gentle peeling can leave layers of the image behind or stretch the photo paper. If a photo resists removal, stop and consider safer alternatives like dental floss or professional scanning.
Avoid moisture or steam
Humidity and steam can soften adhesives—but also ruin photos. Water exposure may cause ink to run, paper to ripple, or mold to develop. Moisture also makes the plastic overlay of magnetic albums cloudy and harder to scan later.
After Removal – How to Preserve and Store Photos
Once the photo is out, you’re not done. How you store it next can help it last decades—or ruin it fast. Plastic sleeves and old albums are not always safe.
Store photos in acid-free, archival-safe sleeves to protect them long term.
Avoid taping or gluing your photos again. That just repeats the problem. Instead, look for “archival-safe” or “acid-free” photo sleeves and boxes. Store in a cool, dark place—no attics or basements. Humidity and heat will still damage them, even in new packaging.
Want to really keep them safe? Scan them as soon as they’re removed. Upload backups to the cloud. That way, even if the photo gets lost or destroyed later, your memory won’t be.
You can even make a video from photos to turn old albums into something new—perfect for sharing with friends and family.
What If the Photo Is Already Damaged?
Even if a photo is torn, faded, or stuck beyond removal, there are still ways to preserve it—and in many cases, improve how it looks.
Tips for Scanning Stuck or Torn Photos
If a photo is partially stuck or fragile:
- Do not try to remove it further. Leave it in place to avoid more damage.
- Scan the entire album page at high resolution to capture every visible detail.
- Use flatbed scanning (not a phone camera) to minimize glare and distortion.
Restoration Options After Scanning
Once you have a digital copy, experts can often:
- Fix torn edges and digitally “rebuild” missing sections
- Correct color fading, discoloration, or yellowing
- Remove stains, scratches, or tape marks
- Reconstruct water-damaged areas with careful retouching
Services like Capture offer advanced digital restoration, allowing even severely damaged photos to be brought back to life - often looking better than the original.

The best way to protect your memories is to digitize them first. That’s how to safely remove photos from sticky albums—without risking damage.
FAQ
Can I scan photos directly from a magnetic album page?
Yes. If the photo is stuck, scan the entire album page as-is. This preserves the image quality and layout without risking damage from removal.
Is it safe to use heat to remove photos from sticky albums?
Low heat, like a hair dryer on the back of the page, can help—but be cautious. Too much heat can warp or fade the photo. Always test gently and avoid direct contact with the image side.
Should I try to remove photos if the album is falling apart?
Not necessarily. If pages are brittle or photos are deeply stuck, digitizing the album first is usually safer than removal.
How to remove sticky residue from old photos?
Try rubbing gently with a soft cloth. If that doesn’t work, test a small amount of alcohol.
Why Digitizing Is the Safest Long-Term Solution
The safest answer to how to safely remove photos from sticky albums is to digitize them before attempting any separation. When adhesives break down and photos become fragile, professional digitization protects the image without causing damage. It ensures long-term preservation, prevents further fading, and creates high-quality copies that are easy to store, share, or restore. Get started with Capture’s photo digitization service today.


